Bearguy III

Build Fighter

Sazabi "Version Ka"

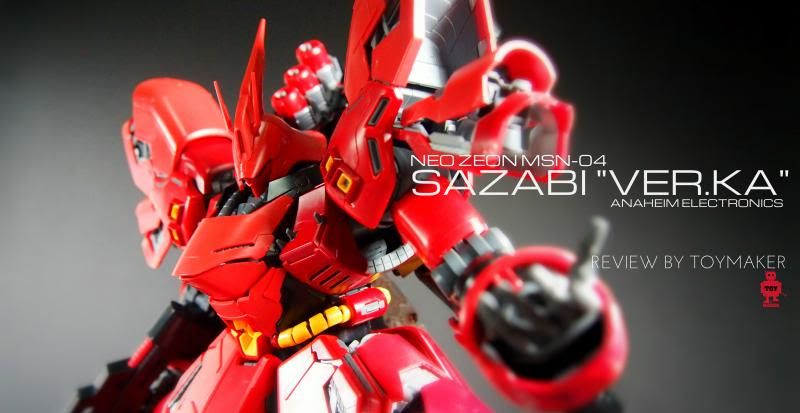
Reviewed by Toymaker

ODIN

REBOOT!

First Look

Review by Toymaker

 photo b25057d1-2a8e-4652-8627-502b93ccd5b6.jpg

Wednesday, October 28, 2009

FAZZ WIP (Part2)

New updates on the legs. This time, I removed the armours on the inner legs as I find them too obstructive and bulky. However, I retain the ones at the calfs.


At this point of time, the legs look a bit short. That has to be retrified later.


Saturday, October 24, 2009

Materials


Hey guys, every now and then I have friends asking me what materials I use for my details and where to get them. Well, maybe I should do a little writeout on this...
The primary material I use are styrene sheets from Evergreen Scale Models. They come in sheets, strips and all types of shapes. I use these a lot for pla-plating and diorama building. You can say they are the "building blocks" of modding.
Locally, you can purchase from a shop call Artfriend situated at Bras Basah complex. They do not come cheap of course. But it's definitely worth it!
Next, Kotobukiya's Modeling Support Goods or "option parts". They comes in all types of shapes and sizes. From minus molds to thrusters, you can add details to your kits with minimum fuss. As you can see, I stock like a ton of these. Very useful stuff to have around.
They are not that easy to get here although some shops carry some stocks. However the range is quite limited. I usually buy in bulk when I go on my yearly Hong Kong trips.


That's about all for now, I will try to organise a bit so that I can have a technical area for my blog later...


Sunday, October 18, 2009

FAZZ WIP (Part1)

I have been working on this one for over a month, progress is damn slow as usual. Planning to enter this in BAKUC but I am not too sure if I can make it with less than two weeks to photo submission. I am hoping for a miracle!

Mr Cheapobay had in fact commissioned me to do a FAZZ and since I did one back in 2004, I thought it is about time for a "renewal". And of course this one is not going to be OOB. Looking at all those chunky pieces of armors, I am already rubbing my hands in glee. Definitely a lot of details to add!


The vents were cut individually.


Here, I am using a combination of cladding as well as open panels to create an illusion of complexity.

Groin extension, don't ask me I just add for no apparent reason...

The grey part at the center of the chest was actually from the gun barrel of a 1/144 Cherudim Gundam sawed in two.

More layers of pla-plate added to minimize the chunkiness at the chest.


An overall view of the body.

Details are quite raw at the moment. I will do a finish touch up before priming. For now, I will proceed to the other limbs.

Updated @ 19/10/2009

Related Posts Plugin for WordPress, Blogger...

READERS