Bearguy III

Build Fighter

Sazabi "Version Ka"

Reviewed by Toymaker

ODIN

REBOOT!

First Look

Review by Toymaker

 photo b25057d1-2a8e-4652-8627-502b93ccd5b6.jpg

Monday, June 4, 2007

MS-18E Kampfer [Kanji Custom] Phase 3

After a long respite, I finally got started on Phase 3 of the build-up process. This time, I am concentrating primarily on the thighs.


I removed the housing and the thrusters at the sides.


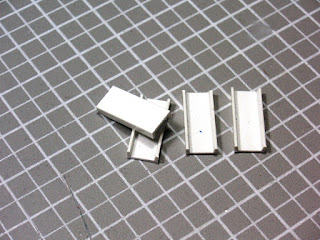
Covered the gaps with pla-plates.


Using strips of pla-plates, I began to "wrap" around parts of the thighs.


Scribed and drilled a hole to insert Kotobukiya option part.


After I am satisfied with the placement of those strips, I added some more details.


Earlier, I have removed the thrusters at the hips as I was planning to replace those with a scratch built "packs". Pla-Plates were used to create the basic shapes.


After I achieved the shapes required, I proceed to add details with option parts (verniers).


More progress on the "packs"


The completed "packs".

Wednesday, May 16, 2007

A new task

I put my Kampfer on hold for awhile and will most probably resume late May. My friend has asked me to create some "accessories" for his maintenance diorama which I gladly accepted. Never really tired of them! Took me five days to do and hopefully I can finish them by this week.

Well, they are really nothing to shout about since it's basically what I have been doing for quite some time. But I think that there are still some major improvements to be made, even though it's about time I attempt other types of dioramas.

I notice that a lot of custom made bases are been sold in the market which would make a lot of modelers happy. However, I reckon that it is more fun and enjoyable to have bases that are of your own creation and hard work.


Box.


More Boxes...


And even more boxes....


My son calls this a "Crane Truck"


Monday, April 16, 2007

MS-18E Kampfer [Kanji Custom] Phase 2

Now for the Phase 2 of the build-up process. For the main body, i tried to add more details and some basic shapes to it. However, I'm still retaining much of its shape. This is going to be pretty pla-plate intensive.


For starters, I filled up all the holes with putty and cut out a piece in front of the chest. I also increased the thickness by about 2mm.


I added some details to the upper torso with pla-plates by layers to create some "depth" to the otherwise flat surface.


Added more details to the chest and replace the pipes with used discarded cables/ wires i found.


More pla-plates for details and replaced those thrusters/ intakes with parts from Wave Option. Very useful stuff indeed!


More pla-plates were used for various details on the torso.


I really hate the curved surface at the groin area, so I had a pla-plate pasted over it and puttied it pending for details.


Cut a section from the I-Beam and shaved off one side to create a "cap".


The "cap" is inserted at the groin area. More details are added including a vernier and a panel line.


I created part of a "housing" for an additional thruster I'm planning.


Scratch built (i called it) maintenance handles for the back.


Created the internals for the housing.


Thruster and parts taken from Wave Option.


Back View with the additional thruster.


Ok, I have finished the main body of the Kampfer and will move on to the limbs pretty soon. My apologies for the lack of description. I think the pictures speak more than a thousand words (not that I have a thousand words to say, hee) !

Related Posts Plugin for WordPress, Blogger...

READERS